Self-Help Guide

Troubleshoot

Common eBike problems, step-by-step fixes, and when to call us. Most issues are simpler than you think.

eBike workshop
Quick Diagnosis
What's Going Wrong?

Tap the symptom that matches your problem to jump straight to the fix.

Start with the basics before assuming the worst — most charging failures are simple connection issues.

  • Check the charger light: green = fully charged, red/amber = charging, no light = fault
  • Inspect the charge port on the bike for dirt, moisture or bent pins — clean with a dry cloth
  • Try a different wall socket to rule out a power supply issue
  • Check the charger cable for any kinks, cuts or loose connections at both ends
  • Some batteries have a reset button — consult your manual or WhatsApp us for your model's location
  • If the battery is completely flat it may need a >30 min "wake-up" charge before the indicator activates

Still not charging after these steps? The battery BMS (Battery Management System) may have tripped. WhatsApp us — this is a quick fix in our mobile workshop.

Range degradation is normal over time, but a sudden drop usually has a fixable cause.

  • Check your riding mode — Sport and Turbo modes consume 2–3× more battery than Eco
  • Tyre pressure: under-inflated tyres create more resistance and drain the battery faster — check weekly
  • Cold weather (below 10°C) temporarily reduces battery range by up to 20% — this is normal
  • Avoid storing the battery fully discharged or at 100% for long periods — store at 50–80% charge
  • If the battery is >2 years old and range has dropped >30%, the cells may need replacing

Battery health check is included in our Rapid Rescue and all higher service tiers.

No power at all is almost always one of these four causes:

  • Battery charge: plug in and wait 5 minutes, then try powering on
  • Battery connection: remove the battery, check the contacts, reseat it firmly
  • Power button: hold for 2–3 seconds (not a quick press) — some models require a long press
  • Check for a lockout mode: some displays have a security lock activated by holding two buttons simultaneously — consult your manual
  • Water ingress: if the bike was exposed to heavy rain, allow 24 hours to dry in a warm space before retrying

If none of these work, the controller or wiring harness may be the issue — book a mobile workshop visit.

Pedal assist (PAS) relies on a sensor detecting pedal movement. Most issues are sensor-related.

  • Check your PAS level on the display — ensure it's set to level 1 or above (not 0)
  • Look at the PAS sensor on the bottom bracket: a small disc with magnets rotates past a sensor. Check it's not cracked, missing magnets, or misaligned
  • The sensor gap should be 1–3mm — if it's moved, gently re-position it
  • Check that the throttle (if fitted) works independently — if throttle works but PAS doesn't, the PAS sensor is the fault
  • Inspect the sensor cable for cuts or a pulled connector at either end

Sensor replacement is a straightforward job for our mobile workshop — typically under 30 minutes on-site.

Intermittent cut-outs are usually caused by overheating, a loose connection, or the brake cut-off sensors.

  • Brake cut-off sensors: eBikes cut motor power when brakes are applied. If a sensor is stuck or misaligned, it may signal "brakes applied" permanently — check the small magnets on each brake lever and the sensors on the frame
  • Overheating: after long uphill climbs, the motor may temporarily cut out to protect itself — wait 5–10 minutes then continue
  • Check the battery connection — a loose battery can cause momentary power loss under load
  • Controller fault: error codes on the display (e.g. E01–E08) indicate specific faults — note the code and send it to us on WhatsApp

eBike motors should be near-silent. Any new noise is worth investigating promptly.

  • Clicking on every pedal revolution: usually a loose chainring bolt, worn chain, or bottom bracket. Check chainring bolts are tight first
  • Grinding from rear wheel: could be the freewheel body, hub bearings, or motor internals. Don't ignore this — book a Trail Ready or Peak Performance service
  • Whirring that increases with speed: check spokes aren't loose (ping each one — a dull sound = loose spoke) and that nothing is rubbing the wheel
  • Rattling: check mudguard bolts, rack bolts, and any accessories are secure

A blank display doesn't always mean a major fault.

  • Hold the power button for 3–5 seconds — some displays have an auto-off timer
  • Check battery charge level: the display is the first thing to fail when the battery is almost empty
  • Water on the display: power off, dry thoroughly, leave for an hour, then retry
  • Error codes: the most common codes and their meaning:
Code Likely Cause Action
E01 Battery voltage too low Charge fully, retry
E02 Motor phase fault Call us — motor wiring check
E03 Throttle fault Check throttle cable / replace
E04 PAS sensor fault Check sensor gap & magnets
E05 Controller overtemp Let bike cool 10 min, retry
E06 Brake sensor stuck Check brake lever magnets

Got a code not listed here? WhatsApp us the code and we'll diagnose it immediately.

Spongy hydraulic brakes mean air in the brake lines — the system needs bleeding.

  • First check: squeeze the lever hard 10 times in a row — if it firms up temporarily, the fluid is low or air is present
  • Check the brake fluid reservoir (usually at the lever clamp) — if the level is visibly low, top up with the correct fluid type (DOT 4 or mineral oil — do not mix these)
  • Bleeding hydraulic brakes requires specific tools and technique — we recommend booking a service rather than attempting this without experience
  • Check that brake pads are not worn below 2mm thickness — worn pads cause spongy feel and longer stopping distances

Brake bleed is included in our Trail Ready service (R1 450).

  • Disc rub: spin the wheel slowly — if you hear/feel intermittent rubbing, the disc is slightly bent or the calliper is misaligned. Loosen the two calliper bolts, squeeze the brake lever to centre the calliper, re-tighten while holding the lever
  • Constant rubbing: the disc may be bent — hold a fixed reference next to the disc while spinning to identify the bend location. Minor bends can be corrected with a disc truing fork
  • Grinding sound: brake pads may be completely worn through to the metal backing plate — stop riding immediately and book a mobile workshop visit
  • Contaminated pads: oil or brake fluid on pads causes grinding and reduced stopping power. Pads cannot be cleaned — replacement is required

90% of gear issues are caused by cable tension or a dirty drivetrain — both are DIY-fixable.

  • Cable tension: with the bike in the middle gear, pedal slowly and turn the barrel adjuster (at the derailleur or shifter) anti-clockwise in half-turn increments until the skipping stops
  • Clean and lube the chain: a dry or dirty chain causes poor shifting. Apply chain lube after every ride in wet conditions and every 100km in dry conditions
  • Limit screw adjustment: if the chain is dropping off the smallest or largest cog, the derailleur limit screws (marked H and L) need adjusting — very small turns (1/8 rotation) at a time
  • Worn chain or cassette: a stretched chain accelerates cassette wear. If you can pull the chain away from the chainring by more than 2–3mm, it needs replacing

Full drivetrain service is covered in our Peak Performance service (R2 200).

Most eBike tyres are tubeless-ready or fitted with Slime puncture protection — but punctures still happen.

  • Slow leak: check the valve core — press the valve tip and listen/feel for air escaping. Tighten or replace the valve core (very cheap, sold at any bike shop)
  • Slime-protected tyres (e.g. The Titan): rotate the wheel so the puncture is at the bottom — Slime self-seals most punctures under 3mm. Inflate to correct pressure and ride slowly for 5 minutes to distribute the sealant
  • Tube puncture: remove the wheel, locate the puncture using the submersion method (submerge tube in water, look for bubbles), patch with a standard bicycle patch kit
  • Correct pressures: Urban Cruiser (20"×3"): 20–35 PSI  |  Titan (26"×4" fat): 8–20 PSI  |  Street Ripper: check sidewall marking
  • Recurring punctures from the same spot: a foreign object may still be embedded in the tyre — run your finger carefully around the inside of the tyre to check

A wobbling wheel usually means loose or broken spokes, or a bent rim.

  • Spoke check: ping each spoke with your finger — a dull sound indicates a loose spoke. Loose spokes can be tightened with a spoke key but wheel truing requires experience to avoid making it worse
  • Quick check: lift the affected wheel off the ground and spin it — watch the gap between tyre and brake calliper. More than 2mm of lateral movement means the wheel needs truing
  • Bent rim: if the wheel has taken a hard impact, the rim may be bent. This is not a DIY fix — the wheel needs to be rebuilt or replaced

Wheel truing is included in our Peak Performance service. For a bent rim, book a mobile workshop for assessment.

Know Your Limits
When to Call Us

Some things are quick DIY fixes. Others need the right tools and experience — and that's what we're here for.

🔧
Safe to DIY

Tyre pressure checks & inflation  ·  Chain lubrication  ·  Cleaning the bike  ·  Minor gear cable tension adjustments  ·  Patching a tube puncture  ·  Tightening loose bolts (accessories, rack, mudguards)  ·  Replacing brake pads (rim brakes)  ·  Checking and seating the battery

📞
Call Us

Hydraulic brake bleeding  ·  Motor or controller diagnostics  ·  Battery BMS reset or replacement  ·  Wheel truing  ·  Bottom bracket or headset service  ·  Electrical wiring faults  ·  Drivetrain replacement  ·  Suspension fork service  ·  Persistent error codes

Mobile Workshop
Still stuck?
We've Got You.

WhatsApp us a photo or video of the problem and we'll diagnose it for free. If it needs a visit, we'll come to you.

⚡ WhatsApp Tyrone WhatsApp Kyle
Need a Service?
Our Service Plans

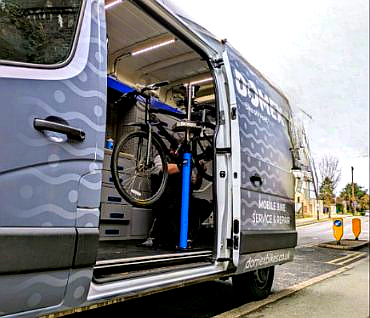
From a quick fix to a full overhaul — we come to you.